

The difference between a masterfully crafted bedroom and a mediocre DIY project isn’t found in the timber or the finish; it’s found in the precision of a three-millimetre gap. You likely recognise that bespoke doors offer a sophisticated alternative to a full room renovation, yet the fear of a single miscalculation when learning how to measure for new wardrobe doors often halts the most inspired home improvements. It’s common to feel overwhelmed by the technicalities of aperture dimensions or hinge hole placements, especially when the goal is a seamless, professional-looking finish.
This guide empowers you with the technical expertise to order your doors with absolute certainty. We’ll demystify the confusion between measuring the existing door versus the structural opening whilst providing a clear methodology for a high-end result. You’ll learn the industry secrets of the “reveal” and the essential clearance requirements, such as the 50cm to 60cm needed for hinged doors, to transform your storage into a statement of luxury craftsmanship. This step-by-step walkthrough provides the confidence to achieve a flawless alignment and a refined aesthetic without the expense of a full wardrobe replacement.
Key Takeaways
- Adopt millimetre-perfect accuracy using the ‘measure twice, order once’ philosophy to ensure a flawless fit for bespoke doors.
- Master the three-point check method to understand how to measure for new wardrobe doors whilst accounting for the ‘reveal’ gaps that define a luxury finish.
- Identify the critical role of hinge hole centre measurements to ensure total compatibility with your existing cabinetry.
- Learn the professional template method for navigating complex installations, including sloped ceilings and bespoke IKEA PAX upgrades.
- Utilise our final verification checklist to confidently select your preferred aesthetic, from Skinny Shaker to hand-sprayed Mirror Fret designs.
Preparing for Precision: Essential Tools and Mindset
Achieving a high-end finish begins long before a saw touches timber. It starts with a fundamental shift in perspective. When you are learning how to measure for new wardrobe doors, you must move beyond the casual approximations common in standard furniture assembly. Bespoke manufacturing demands millimetre-perfect accuracy because there is no margin for error in luxury design. A single millimetre can be the difference between a door that glides silently and one that catches on the frame. This “Measure Twice, Order Once” philosophy is the bedrock of professional cabinetry, ensuring that every bespoke component integrates flawlessly into your living space.
Identify the structure you are working with before you begin. Whether you are upgrading a built-in alcove, a free-standing unit, or a modern carcass, understanding cabinet construction is vital for determining where the door will sit. You aren’t merely measuring an old door; you are measuring the potential of the aperture. This requires a psychological shift. You must measure for the door you want to see, rather than simply replicating the dimensions of a poorly fitted predecessor. This meticulous approach ensures that even in older homes where walls are rarely plumb, the final result looks intentional and perfectly aligned.
The Professional Toolkit
Precision requires the correct instruments. Professional installers never rely on flexible fabric tapes or plastic rulers that might stretch or warp under tension. Your toolkit should be organised and include:
- Quality steel tape measure: Ensure the blade is wide and stable enough to remain straight over long vertical spans without buckling.
- Digital calliper: This tool is essential for measuring hinge hole depths and diameters with absolute certainty.
- Spirit level: Use this to check for floor and wall plumbness, as this affects how you calculate your clearance gaps.
- Dedicated measuring sheet: Record every dimension systematically to avoid the confusion of loose notes or mental tallies.
Terminology You Need to Know
To communicate effectively with bespoke manufacturers, you must use the language of the trade. These terms define the geometry of your wardrobe and how the doors will eventually behave:
- Aperture: The internal opening of your wardrobe frame. This is the structural “hole” the door must either cover or sit within.
- Overlay: The distance the door extends over the front edge of the frame. This is a common feature in modern, frameless cabinetry.
- Reveal: The deliberate, narrow gap left between doors or between the door and the floor. This gap provides the necessary clearance for movement whilst creating the clean, rhythmic lines associated with high-end furniture.
Step-by-Step: Measuring the Aperture and Door Sizes
Measuring the aperture is the most critical phase of your project. Many homeowners feel a sense of trepidation when learning how to measure for new wardrobe doors because they assume every opening is a perfect rectangle. In reality, structural shifts in British homes mean frames are rarely square. To overcome this, you must employ the “Three-Point Check”. This process involves taking three horizontal width measurements (top, middle, and bottom) and three vertical height measurements (left, centre, and right). By identifying the variances across the frame, you can ensure your bespoke order accounts for the tightest spots in the opening.
Measuring Width and Height
When you record your figures, always prioritise the smallest width and height measurements. This prevents the doors from binding against the frame during operation. However, a professional finish relies on the “reveal”—the subtle gap that allows for movement and aesthetic alignment. For a high-end look, you should typically subtract 2mm to 3mm from each side of your smallest aperture measurement. If you are learning how to measure for replacement wardrobe doors made to measure on existing frames, you must also decide between an in-frame design or a lay-on door. Lay-on doors sit on the face of the carcass, whilst in-frame doors sit flush within the opening, requiring even tighter tolerances.
Do not overlook the impact of your flooring. Carpet requires a larger bottom clearance, often up to 10mm, to accommodate the pile height and compression. Hard floors like oak or tile are more predictable, usually requiring only a 3mm to 5mm gap. A helpful reference for visualising these clearances is , which illustrates how these initial measurements translate into a functional installation.
Checking for Squareness
A frame can have the correct width and height but still be “racked” or leaning. To verify the geometry, measure the diagonals from corner to corner. If the two measurements are identical, your frame is perfectly square. If they differ by more than 5mm, you will need to adjust your door sizes or use scribing pieces to hide the discrepancy. A spirit level is an indispensable ally here. Use it to identify if the floor slopes or if the walls are out of plumb, as these factors will dictate how the doors hang and meet in the centre. Once you have secured these precise dimensions, you can confidently browse our collection of bespoke wardrobe styles to begin your transformation.
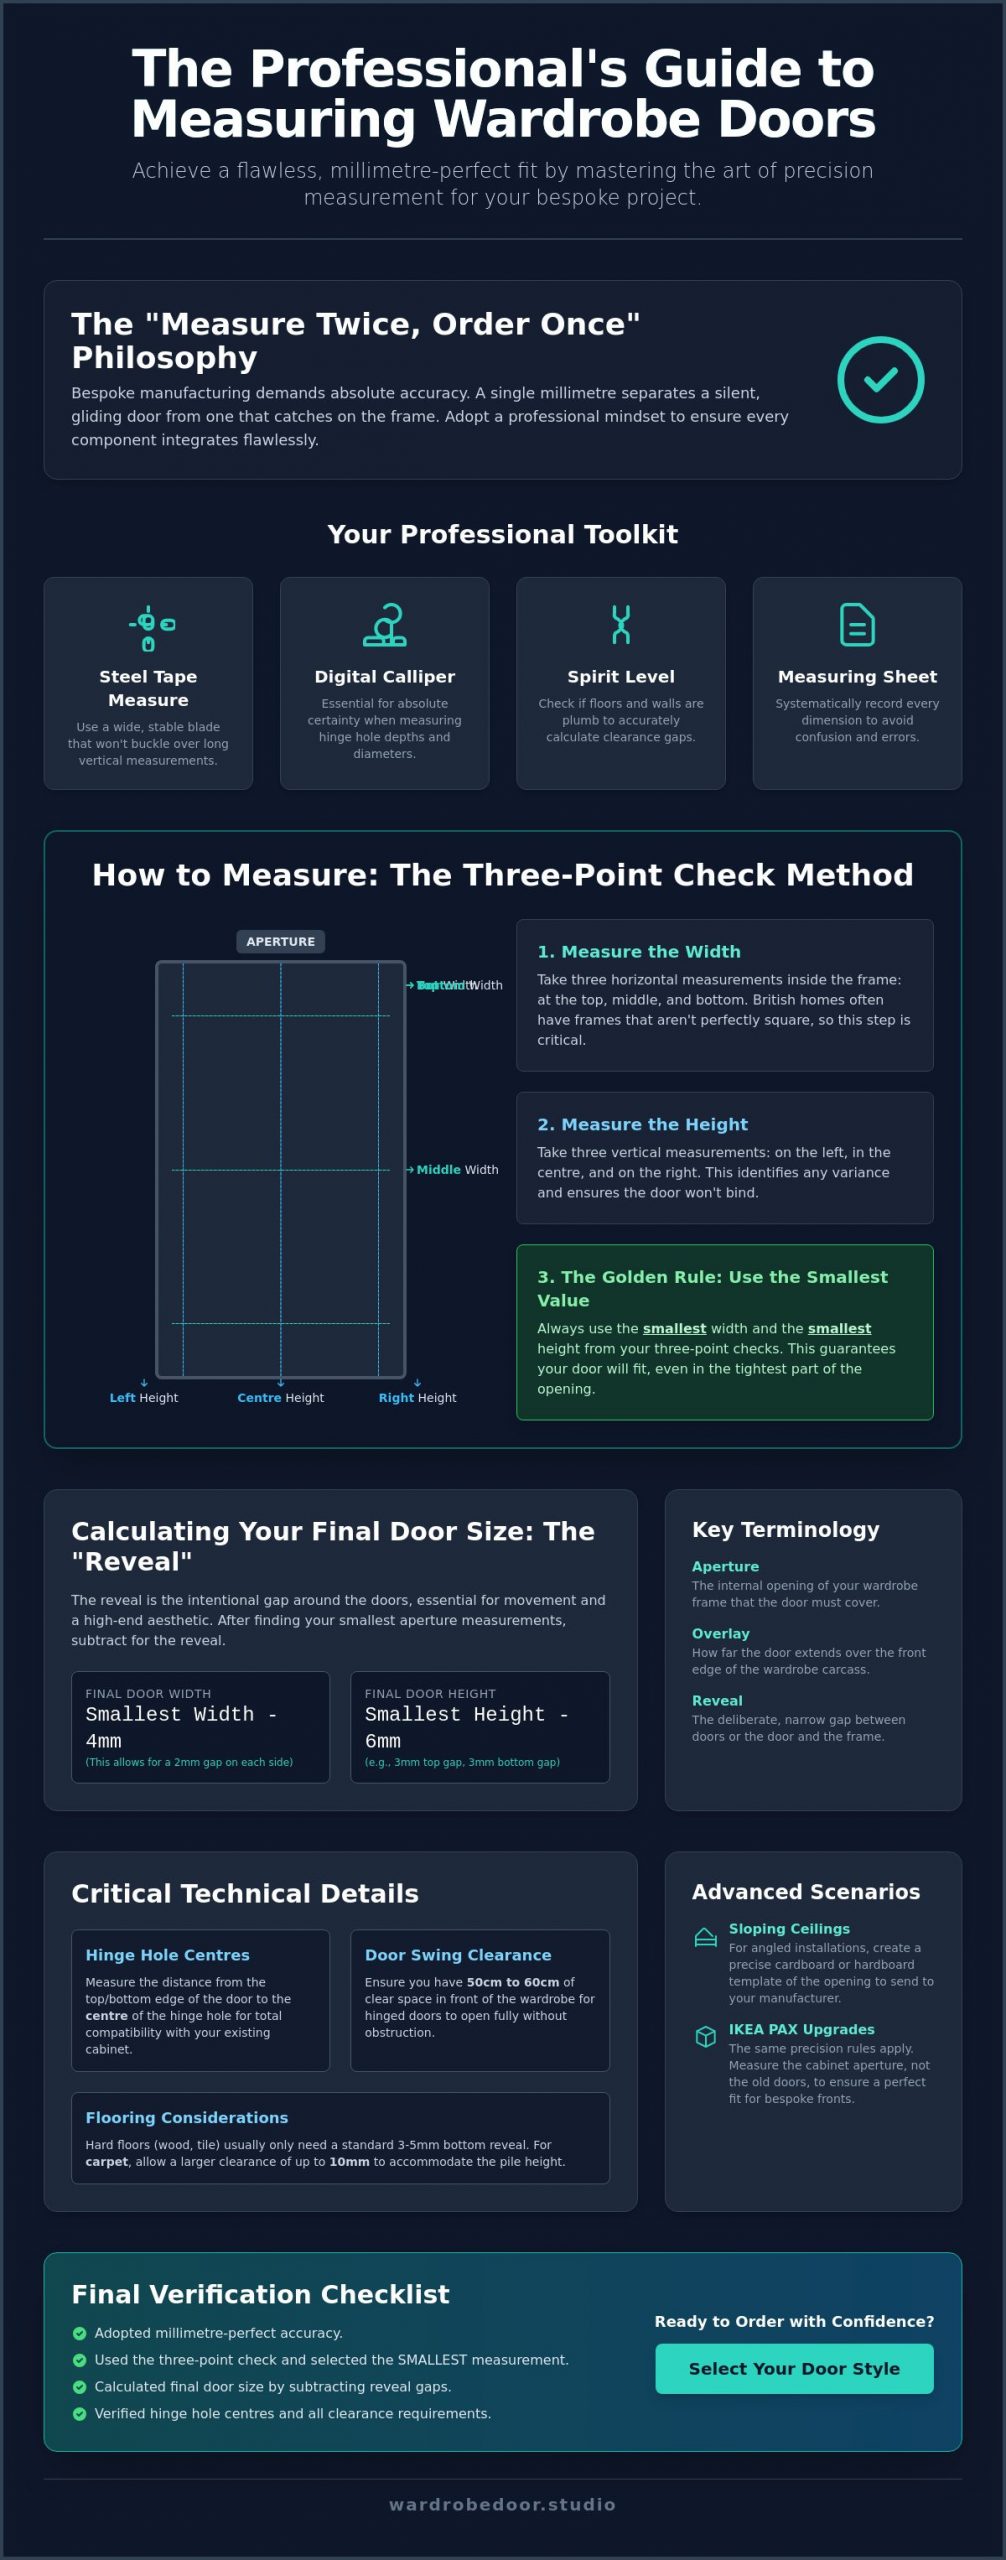
The Technical Detail: Hinge Holes and Clearance Gaps
Precision in aperture measurement ensures the door fits the frame, but the hinge configuration dictates how that door lives within your room. When determining how to measure for new wardrobe doors, the hinge hole placement is often the most critical technicality. A door that is perfectly sized but incorrectly bored will never hang straight, which undermines the entire bespoke aesthetic. You must approach this hardware phase with the same millimetre-perfect mindset used for the structural dimensions. This is especially true for hand-sprayed finishes where the weight of the material requires stable, perfectly aligned support points.
Hinge Hole Positioning
Measuring for hinges requires identifying the “centre” point. This is the exact distance from the top or bottom edge of the door to the dead centre of the 35mm circular cup. Whilst the UK industry standard is frequently 100mm, older bespoke units or unique loft conversions often require custom positioning to avoid internal shelving or drawers. You should measure from the top of the door down to the centre of the top hinge, and from the bottom of the door up to the centre of the bottom hinge. For taller doors exceeding 1600mm, a third or fourth central hinge is necessary. Record the distance from the top edge to the centre of these middle holes to ensure a perfect match with your existing carcass. If you are retrofitting, use your digital calliper to verify the cup depth; most professional-grade hinges require a 12mm to 13mm depth to sit flush without compromising the door face.
Clearance and Overlays
The type of hinge you select influences the required clearance gaps and the final visual alignment. Full overlay hinges allow the door to cover almost the entire front edge of the carcass, whilst inset hinges require the door to sit inside the frame with a consistent reveal. Calculating the clearance is especially vital for doors situated near walls or ceilings. A door with a 170-degree wide-angle hinge requires significantly more lateral space than a standard 110-degree version to avoid striking the adjacent wall. This technical consideration is paramount when selecting intricate wardrobe door styles uk, such as our Mirror Fret or Skinny Shaker designs. These sophisticated styles require sufficient edge clearance to ensure the decorative fretwork or slim stiles are not obscured or damaged by contact with the frame during operation. Always maintain a 2mm gap between double doors to prevent clashing, ensuring the silent, effortless movement associated with high-end craftsmanship.
Advanced Scenarios: Sloping Ceilings and IKEA PAX Upgrades
Achieving a seamless fit within the architectural quirks of a British home often requires more than standard vertical measurements. When you consider how to measure for new wardrobe doors in a loft conversion or beneath a staircase, the complexity increases significantly. These spaces rarely feature the right angles found in modern developments. Instead, they demand a bespoke approach that respects the unique geometry of your property whilst maintaining the high-end finish of a professional installation. Mastering these advanced scenarios ensures that even the most awkward alcoves become functional statements of luxury.
The IKEA PAX Factor
The IKEA PAX system remains a popular choice for its internal versatility, yet the standard door options often fail to reflect a premium aesthetic. You can elevate these mass-market frames by specifying pax wardrobe door alternatives that utilise the original hinge mounting points but offer a superior hand-sprayed aesthetic. A professional secret to achieving a truly “built-in” look is to measure the doors to extend slightly above the carcass. This masking of the frame creates the illusion of floor-to-ceiling cabinetry, effectively hiding the standard unit behind a bespoke architectural feature. When measuring for these upgrades, verify the internal hole positions carefully, as PAX frames use a specific 32mm system for hinge spacing.
Sloping and Angled Doors
Angled doors present the ultimate test of precision in any bedroom renovation. To capture the geometry correctly, you must record both the “Short Side” and the “Long Side” of the door, alongside the total width at the base. Calculating the slope angle in degrees is essential for the manufacturing process to ensure the diagonal cut is perfect. For particularly complex angles, such as those found in eaves or under-stairs wardrobes, the paper template method is the safest route to success. By tracing the exact shape of the aperture onto a large sheet of lining paper, you provide a physical blueprint that eliminates the risk of mathematical error. This meticulous preparation ensures that even the most challenging spaces benefit from the elegance of our bespoke fitted wardrobes.
Before you commit to your final dimensions, remember that sloping doors require specific hinge placements to allow for the weight distribution on the angled edge. Always double-check that your “Short Side” measurement provides enough vertical height for at least two hinge points. This attention to detail prevents the door from sagging over time, preserving the clean lines and effortless operation that define high-quality craftsmanship.
Transitioning from Measurements to Installation
Once you have recorded your dimensions with meticulous care, the transition from technical data to artistic vision begins. This final phase is where your preparation meets the manufacturing process. Before you submit your order, a rigorous verification is non-negotiable. It’s the moment to cross-reference your three-point check and ensure that every millimetre aligns with your intended design. Understanding how to measure for new wardrobe doors is an exercise in foresight; it’s about anticipating how those figures will translate into a physical product that glides effortlessly within your home. A professional-grade order is defined by this final pause to double-check the details.
Reviewing Your Style Choice
Your measurements must harmonise with your chosen aesthetic. If you have opted for skinny shaker wardrobe doors, for example, the slim stiles require precise hinge positioning to avoid encroaching on the decorative profile. Similarly, Mirror Fret designs demand a consistent reveal to ensure the intricate patterns remain perfectly centred across the wardrobe’s face. You should also consider how the hand-sprayed finishing will interact with the room’s natural light. A high-quality finish adds a layer of depth that can subtly alter the perceived size of the doors, making your initial calculations for clearance gaps even more vital. Don’t forget to match your hardware and handles to these dimensions; a handle that is too large can disrupt the symmetry of a bespoke panel.
Ready for the Fit?
Preparing your workspace for the arrival of your bespoke doors is the final step in the journey. You should clean the existing frame thoroughly and remove all redundant hardware. If you are retrofitting new doors to an older carcass, you may need to fill previous hinge holes with a high-quality wood filler to provide a stable foundation for the new components. This ensures that when you begin the process of how to fit wardrobe doors, the installation is as seamless as the measuring process was. A clean, organised environment allows you to focus on the fine adjustments of the hinges, which is essential for achieving that elusive, high-end “reveal” gap.
The journey from a simple tape measure to a fully transformed bedroom is a rewarding one. By following a structured, professional methodology, you eliminate the risks associated with guesswork and DIY approximations. You are now equipped with the technical confidence to place an order that reflects your commitment to quality and craftsmanship. Ready to transform your room? Order your bespoke samples today and experience the difference that precision manufacturing brings to your home interior.
Transform Your Space with Technical Confidence
Mastering the intricacies of how to measure for new wardrobe doors is the definitive step towards a home that exudes bespoke luxury. By adopting the three-point check and accounting for the subtle nuances of hinge positioning, you transition from a simple renovation to a statement of fine craftsmanship. Whether you are upgrading a standard IKEA PAX frame or navigating the complex angles of a loft conversion, your commitment to millimetre-perfect accuracy ensures a flawless finish that endures.
As specialists in luxury Skinny Shaker and Mirror Fret styles, we are dedicated to bringing your vision to life with an emphasis on quality and heritage. Every door we produce is hand-sprayed in England and available for nationwide UK delivery, ensuring that our tradition of excellence reaches your doorstep. You now possess the professional methodology required to place your order with absolute certainty and aesthetic intent.
Your journey towards a refined interior starts with a single, precise measurement. Design your bespoke wardrobe doors with Wardrobe Door Studio today and discover the enduring value of precision-made cabinetry. We look forward to helping you create a space that is as functional as it is beautiful.
Frequently Asked Questions
Should I measure the old door or the wardrobe opening?
You should always measure the wardrobe opening, known as the aperture, to ensure absolute precision. Measuring an existing door often replicates previous errors or fails to account for structural sagging that may have occurred over time. By measuring the structural opening at the top, middle, and bottom, you establish a true blueprint for your bespoke doors rather than simply copying a potentially flawed predecessor.
What is the standard hinge hole size for wardrobe doors in the UK?
The standard hinge hole diameter for domestic wardrobe doors in the UK is 35mm. This circular “cup” size is compatible with the vast majority of European-style concealed hinges used in modern cabinetry. When preparing your order, you should also verify the cup depth with a digital calliper; a depth of 12mm to 13mm is typical for ensuring the hardware sits flush without compromising the door’s face.
How much of a gap should I leave between wardrobe doors?
You should typically leave a consistent 2mm to 3mm gap, or “reveal,” between your wardrobe doors. This clearance is essential for preventing the doors from clashing during operation and allows for the natural expansion of materials. When learning how to measure for new wardrobe doors for a double configuration, remember to subtract this total gap from your horizontal aperture measurement before calculating individual door widths.
Can I replace doors on a wardrobe that isn’t perfectly level?
Yes, you can successfully replace doors on a wardrobe that isn’t perfectly level by utilising the adjustment capabilities of high-quality hinges. Most professional-grade hinges offer three-way adjustment to compensate for minor structural leans. If the frame is significantly out of plumb, you should base your order on the smallest aperture dimensions and employ decorative scribing pieces to create the illusion of a perfectly square, bespoke installation. For a comprehensive walkthrough of the full upgrade process, our guide on how to replace wardrobe doors on existing frame units covers every stage from hinge compatibility to achieving a hand-sprayed finish.
How do I measure for wardrobe doors if I have a sloping ceiling?
Measuring for a sloping ceiling requires recording three distinct dimensions: the height of the long side, the height of the short side, and the total width at the base. You must also determine the slope angle in degrees to ensure the diagonal cut is accurate. For complex loft conversions, we recommend the template method using lining paper to capture the exact geometry of the aperture with millimetre-perfect certainty.
What units should I use when measuring for made-to-measure doors?
You must always use millimetres (mm) when recording measurements for bespoke doors. Millimetres are the industry standard for luxury manufacturing because they eliminate the rounding errors associated with centimetres or inches. Achieving the refined aesthetic of a professional installation relies on these granular tolerances, as even a two-millimetre discrepancy can disrupt the alignment and symmetry of your finished wardrobe.
How many hinges do I need for a full-height wardrobe door?
A standard full-height wardrobe door, typically ranging from 2000mm to 2400mm, generally requires four hinges to ensure stability. The weight of the door and the specific style, such as a solid Mirror Fret design, may necessitate a fifth hinge for additional support. Correct hinge distribution prevents the door from bowing or sagging, which is vital for maintaining the clean, rhythmic lines of high-end cabinetry over its lifetime.
Do I need to account for the thickness of the paint or finish?
You don’t need to account for the thickness of the finish when you are determining how to measure for new wardrobe doors. Professional manufacturers manage these tolerances during the production and hand-spraying process to ensure the final product matches your specified dimensions. Your responsibility is to provide the precise structural measurements and desired clearance gaps; the technicalities of the finish application are handled within the manufacturing workspace.


